There are seven types of nail art brushes that anyone can try, including round brushes, striper brushes, flat brushes, angled brushes, fan brushes, detailing brushes, and dotter brushes. Nail art has become a popular trend in the beauty industry, and anyone can try it at home with the right tools.
Good nail art brushes are essential for achieving perfect nail designs. There are various types of brushes that serve different functions in creating intricate nail art designs. From round brushes for creating fine lines to angled brushes for precise detailing, each brush has its own unique purpose.
Whether you’re a beginner or a professional, having a set of these nail art brushes can help you unleash your creativity and achieve stunning nail designs. We will explore the seven different types of nail art brushes that anyone can try, offering a variety of options for creating beautiful nail art. So let’s dive in and discover which brush is perfect for your nail art journey.

Credit: in.pinterest.com
Introduction To Nail Art Brushes
Discover the world of nail art with 7 different types of nail art brushes. From round brushes to detailing brushes, explore endless possibilities for creating stunning nail designs. Get the perfect tools for your nail art journey.
The Importance Of Nail Art Brushes
When it comes to nail art, having the right tools is essential to achieving perfect designs. Nail art brushes play a crucial role in creating intricate and detailed designs on your nails. These brushes are designed with fine bristles that allow for precise and accurate application of nail polish, gels, and acrylics. They come in a variety of shapes and sizes, each serving a different purpose in nail art.
Choosing The Right Nail Art Brushes
Choosing the right nail art brushes can be overwhelming, especially with so many options available. Understanding the different types of brushes and their functions will help you make an informed decision. Here are some popular types of nail art brushes that you can try:
- Round Brush: This brush is perfect for creating intricate designs, dots, and curves on your nails.
- Striper Brush: Ideal for creating thin lines, stripes, and geometric patterns.
- Flat Brush: Great for covering larger nail surfaces and creating clean, straight lines.
- Angled Brush: Designed for precise and controlled application, especially for French tips and detailed designs.
- Fan Brush: Used for creating feathering and gradient effects on your nails.
- Detailing Brush: A must-have for intricate and detailed nail art, such as flowers and intricate patterns.
- Dotter Brush: Perfect for creating dots and small accents on your nails.
Each of these brushes offers a unique way to express your creativity and elevate your nail art game. Experimenting with different brushes will help you discover your preferences and develop your own personal style. Remember, practice makes perfect, so don’t be afraid to experiment and have fun with different brush techniques!
Different Types Of Nail Art Brushes
When it comes to nail art, having the right tools is crucial for achieving stunning designs. Nail art brushes come in various shapes and sizes, each serving a specific purpose. Whether you’re a beginner or a professional, understanding the different types of nail art brushes is essential. Let’s take a closer look at seven popular nail art brushes:
1. Round Brush
A round brush is a must-have for any nail artist. Its fine tip and round shape make it perfect for creating intricate designs, like flowers, dots, and curves. The round brush allows for precise control and is ideal for both beginners and experienced artists.
2. Striper Brush
A striper brush, as the name suggests, is used for creating straight, thin lines. It has long, bristled hairs that are tightly packed together, making it easy to draw precise lines on your nails. Whether you want to create French tips or intricate patterns, a striper brush is a versatile tool.
3. Flat Brush
The flat brush is a wide brush with straight, flat bristles. It is excellent for covering large areas of the nail quickly and evenly. With its broad shape, it is an ideal choice for creating solid-colored backgrounds or painting gradients.
4. Angled Brush
An angled brush is perfect for creating diagonal lines, angled shapes, and intricate details. The angled shape of the brush allows for precise control and easy maneuverability. Whether you want to achieve sharp edges or create 3D effects, the angled brush is a versatile tool to have in your collection.
5. Fan Brush
A fan brush is a unique brush with thin, spread-out bristles. It is primarily used for creating delicate, wispy designs like feathers and gradients. The fan brush allows for soft blending and gives a subtle, airy effect to your nail art.
6. Detailing Brush
A detailing brush is a fine, thin brush used for creating intricate details and fine lines. It is perfect for adding tiny details to your nail art, like dots, outlines, and intricate patterns. The thin, precise tip of the detailing brush ensures accuracy and precision.
7. Dotter Brush
A dotter brush is a small tool with a round, ball-like tip. It is specifically designed for creating dots of various sizes. It is a must-have for nail art enthusiasts who love adding dots to their designs, whether it’s a polka dot pattern or creating eyes for character nail art.
Each of these nail art brushes has its unique purpose and can help you achieve stunning nail designs. Experiment with different brushes to unleash your creativity and take your nail art to the next level!
How To Use Different Nail Art Brushes
Discover how to use different nail art brushes with these 7 types that anyone can try. From round brushes to striper brushes, flat brushes to angled brushes, there are various options to create stunning nail art designs. Experiment with different brushes for different functions and achieve professional results at home.
Using The Round Brush
To use a round brush for nail art, dip the brush into your chosen nail polish color. Then, gently press the brush onto your nails to create round shapes. This brush is perfect for creating polka dots, flowers, and other circular designs. Experiment with different pressure and angles to achieve various sizes and effects.Using The Striper Brush
The striper brush is ideal for creating precise lines and intricate details on your nails. Dip the brush into your desired nail polish color, then hold it perpendicular to your nails. Apply light pressure and slowly move the brush to create thin or thick lines. This brush is great for creating stripes, chevron designs, and intricate patterns.Using The Flat Brush
The flat brush is versatile and can be used for various nail art techniques. To use this brush, load it with nail polish and gently press it onto your nails to cover a larger surface area. This brush is perfect for creating gradients, ombre effects, and filling in larger areas with color.Using The Angled Brush
The angled brush is great for creating straight lines and precise angles on your nails. Load the brush with nail polish and hold it at a slight angle. Apply light pressure and move the brush in a straight line to create clean and crisp designs. This brush is perfect for creating geometric patterns, French tips, and corner details.Using The Fan Brush
The fan brush is unique and creates a feathered or textured effect on your nails. Dip the brush into your chosen nail polish color, then gently fan it across your nails in a brushing motion. This brush is perfect for creating gradients, splatter effects, and abstract designs. Experiment with different movements to achieve different textures.Using The Detailing Brush
The detailing brush is used for intricate and detailed nail art designs. Dip the brush into nail polish and apply light pressure to create precise lines and small details. This brush is perfect for creating intricate patterns, swirls, and small accents on your nails. Take your time and have patience when using this brush for the best results.Using The Dotter Brush
The dotter brush is excellent for creating dot designs and adding small accents to your nails. Dip the brush into your chosen nail polish color, then gently press it onto your nails to create dots. This brush is perfect for creating polka dots, flowers, and other dotted designs. Vary the pressure and size of the dots by using different parts of the brush. Now that you know how to use different nail art brushes, you can unleash your creativity and try various techniques to achieve stunning nail art designs. Remember to practice and experiment with different brush strokes to find your own unique style. Have fun and let your nails be your canvas!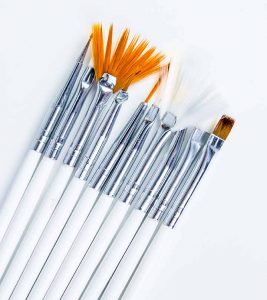
Credit: www.stylecraze.com
Tips And Techniques For Nail Art Brush Applications
Discover the 7 different types of nail art brushes that anyone can try, including round brushes, striper brushes, flat brushes, angled brushes, fan brushes, detailing brushes, and dotter brushes. These brushes offer various functions and can help you achieve beautiful nail art designs.
Creating Fine Lines And Details
When it comes to creating fine lines and intricate details on your nail art designs, a detail brush is a must. This brush typically has a thin, pointed tip that allows for precise application. Dip the brush into your desired nail polish color and gently glide it along your nails to create fine lines, swirls, or intricate patterns. With a steady hand and a bit of practice, you’ll be able to create stunning nail art designs with ease.
Blending Colors
Blending colors is a popular technique in nail art that adds depth and dimension to your designs. To achieve this effect, you’ll need a flat brush or an angled brush. Start by applying two or more colors next to each other on a nail art palette or a piece of aluminum foil. Dip your brush into the colors and gently mix them together. Then, using a sweeping motion, apply the blended colors to your nails. This technique allows you to create seamless transitions between different shades, giving your nail art a professional and artistic look.
Creating Ombre Effects
Ombre nail art has become a trendsetter in the beauty industry, and you can easily achieve this effect with the right brush. For ombre nail art, a sponge brush or a fan brush works best. Apply your base color to the entire nail and let it dry. Then, using the brush, apply a lighter or darker shade of nail polish to the tips of your nails. Gently blend the colors together using a dabbing motion or light strokes until you achieve a smooth gradient effect. This technique allows you to create a chic and trendy ombre look on your nails.
Making Gradient Designs
Gradient nail art is another popular technique that adds a touch of elegance to your nails. To create a gradient effect, you’ll need a flat brush or a sponge brush. Start by applying your base color to the entire nail and let it dry. Then, on a nail art palette or a piece of aluminum foil, apply two or more colors in a gradient pattern. Dip your brush into the colors and gently sweep it across your nails from the base to the tips. This technique allows you to create a smooth and seamless transition from one color to another, giving your nails a gradient design.
Creating Dot Patterns
Dot patterns are a fun and playful way to add a pop of color to your nail art designs. To create dot patterns, you’ll need a dotting tool or a detail brush with a rounded tip. Dip the brush into your chosen nail polish color and gently press it onto your nails to create dots of various sizes. You can create patterns such as polka dots, flowers, or even intricate geometric designs. The dotting tool or detail brush allows for precise application, making it easier for you to create beautiful dot patterns on your nails.
Maintaining And Caring For Nail Art Brushes
Proper cleaning techniques, storing and drying the brushes, and replacing and restoring brush tips are essential for maintaining your nail art brushes and ensuring they last a long time. By following these simple steps, you can keep your brushes in excellent condition and achieve flawless nail art designs every time.
Proper Cleaning Techniques
Regularly cleaning your nail art brushes is crucial to maintain their functionality and prevent product buildup. Here’s how you can effectively clean your brushes:
- Gently wipe off excess nail polish or acrylic residue from the brush using a lint-free cloth or paper towel.
- Fill a small container with warm water and add a few drops of gentle brush cleaner or mild soap.
- Dip the brush bristles into the solution and swish it around to loosen any remaining product.
- Rinse the brush under running water until the water runs clear.
- Pat the brush dry with a clean cloth or paper towel, reshaping the bristles if necessary.
Storing And Drying The Brushes
Proper storage and drying methods are vital to prevent damage to the bristles and maintain the shape and integrity of the brushes. Here’s how you can store and dry your nail art brushes:
- After cleaning the brushes, make sure to remove excess water and reshape the bristles.
- Place each brush horizontally in a clean, dry container or brush holder, ensuring the bristles do not touch each other.
- Avoid storing your brushes in an area with high humidity or extreme temperatures, as this can cause the bristles to warp or deteriorate.
- Allow the brushes to air dry naturally, avoiding direct sunlight or heat sources that may damage the bristles.
Replacing And Restoring Brush Tips
Over time, brush tips may become worn out or damaged, affecting the quality of your nail art. It’s essential to know when to replace or restore brush tips. Here’s what you can do:
- If your brush tip becomes frayed or splayed, it’s time to replace it with a new brush tip or consider purchasing a new brush.
- Some brush tips, especially those made of synthetic materials, can be restored by carefully trimming the frayed bristles using small manicure scissors.
- Make sure to reshape the brush tip after trimming to ensure proper application and precision.
By following these tips on cleaning, storing, and maintaining your nail art brushes, you can extend their lifespan and continue creating stunning nail art designs effortlessly.

Credit: in.pinterest.com
Frequently Asked Questions On 7 Different Types Of Nail Art Brushes That Anyone Can Try
What Type Of Nail Brush Is Best?
Kolinsky sable brushes are the best type of nail brush for professionals. Red sable brushes are also effective but not as high-quality as kolinsky sable. There are various other brushes like round, striper, flat, angled, fan, detailing, and dotter brushes for different nail art purposes.
What Is The Most Common Brush Shape Used For Nail Art?
The most common brush shape used for nail art is round brush, striper brush, flat brush, angled brush, fan brush, detailing brush, and dotter brush. These brushes offer different functionalities for creating various nail art designs.
What Is The Finest Nail Art Brush?
The finest nail art brush depends on personal preference, but some popular choices include Kolinsky sable brushes and red sable brushes. These brushes are effective for holding the liquid monomer and laying down the acrylic mix. Different nail art brushes like round brushes, striper brushes, flat brushes, angled brushes, fan brushes, detailing brushes, and dotter brushes are also available for various nail art techniques.
What Number Nail Brush Is Best For Beginners?
For beginners, it is recommended to start with a round brush for nail art. Round brushes are versatile and easy to use for basic designs.
Conclusion
There are seven different types of nail art brushes that anyone can try. These include the round brush, striper brush, flat brush, angled brush, fan brush, detailing brush, and dotter brush. Each brush has its own unique function and can help you achieve various nail art designs.
Whether you’re a beginner or a professional, having the right tools is essential for creating stunning nail art looks. So, go ahead and experiment with different brushes to unleash your creativity and elevate your nail art game.
DIY hair oils are some of the most important ingredients to have in your beauty arsenal. They add shine, manage frizzy hair, and help improve your hair health.