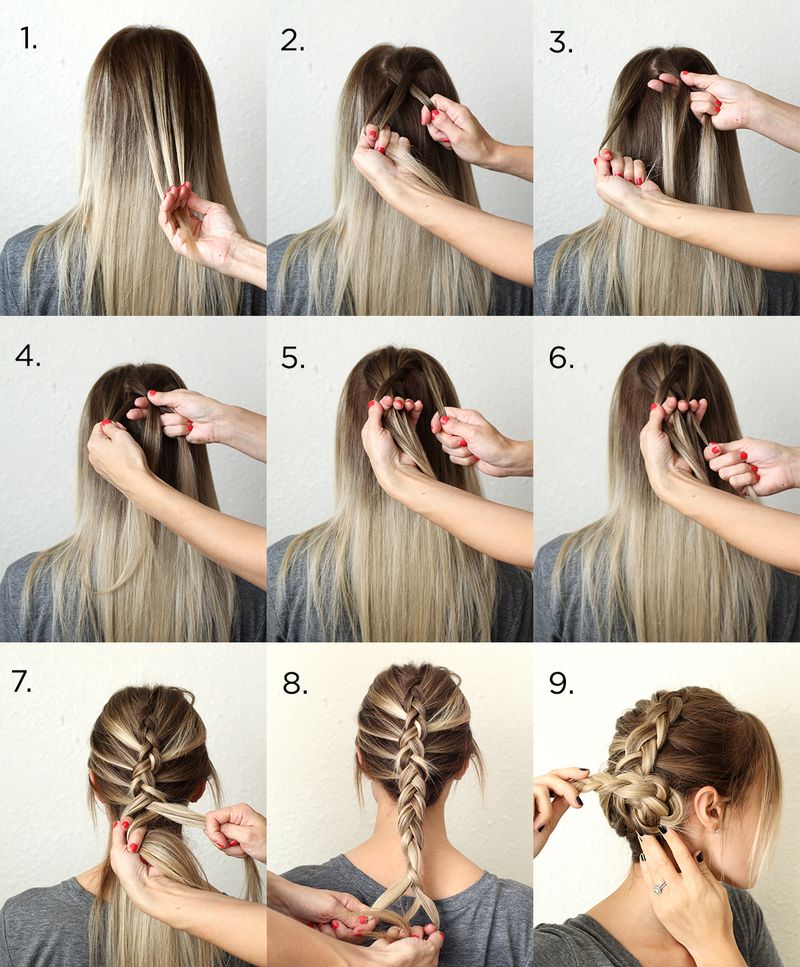
Learn how to make a Dutch braid step by step with this easy-to-follow tutorial. Cross the right strand under the center, then the left under the new center.
Add more hair on the right side of the section and cross under the center. Repeat on the left side, alternating crossing right and left under the center, adding more hair each time until all hair is incorporated.
Plait the braid to the ends for a beautiful Dutch braid hairstyle.

Introduction To Dutch Braids
Dutch braids are a popular and versatile hairstyle that adds emphasis and style to any look. Dutch braids are created by crossing the hair under the center, unlike French braids, giving a unique 3D effect. Dutch braids are the perfect choice, whether you are looking for a chic and polished everyday look or a bohemian-inspired hairstyle for a special occasion. In this tutorial, we will explore what Dutch braids are, their benefits, and how you can easily create them step by step.
What Is A Dutch Braid?
A Dutch braid, also known as an inverted or inside-out braid, is one where the hair is crossed under the center instead of over. This creates a visually stunning look that adds texture and depth to your hair. Dutch braids start at the top of your head and continue down to the ends, incorporating hair as you braid. This technique is perfect for showcasing colored or highlighted strands, giving your hairstyle a unique and eye-catching appearance.
Benefits And Versatility Of Dutch Braids
Dutch braids offer several benefits, making them a go-to hairstyle for many occasions. Firstly, they are incredibly versatile, allowing you to create a wide range of looks. Whether you want a sleek and polished braid for a professional setting or a loose and bohemian braid for a casual day out, Dutch braids can be styled in various ways to suit your preferences.
Additionally, Dutch braids are ideal for all hair types and lengths. You can easily incorporate Dutch braids into your hairstyle, whether you have long, medium, or short hair. They work particularly well with wavy or curly hair, as the 3D effect adds more definition to the natural texture.
Furthermore, Dutch braids have excellent staying power. Once properly secured, Dutch braids can last for hours without becoming loose or messy. This makes them perfect for long events or active days when you need a hairstyle that will stay in place.
Whether a beginner or an experienced braider, learning to create Dutch braids is a valuable skill that can elevate your hairstyling game, in the next section, we will walk you through a step-by-step tutorial on how to make a Dutch braid so you can confidently create this stunning hairstyle on your own.
Step-by-step Tutorial On How To Make A Dutch Braid
Learn how to make a Dutch braid with our step-by-step tutorial. Follow these easy instructions to create a beautiful and stylish Dutch braid hairstyle.
Are you looking to create a stylish and trendy hairstyle that is easy to do at home? Look no further than the Dutch braid! Also known as the reverse braid or the inside-out braid, the Dutch braid adds a unique touch to your everyday look. This step-by-step tutorial will guide you through creating a stunning Dutch braid. So, grab your hairbrush, and let’s get started!
Preparing The Hair
- Start by brushing your hair to remove any tangles. This will ensure a smooth and neat braid.
- Apply a small amount of styling product or hair oil to add shine and control any frizz.
- Divide your hair into three equal sections: left, center, and right. Secure the remaining hair with a tie or clip to keep it out of the way.
Creating The Dutch Braid
- Begin the braid by crossing the right section under the center section.
- Next, cross the left section under the new center section.
- Now, it’s time to add more hair to the braid. Add a small section of hair from the right side to the right area.
- Cross the right section, along with the added hair, under the new center section.
- Repeat the same process on the left side. Add a small section of hair from the left side to the left area and cross it under the new center section.
- Continue alternating between crossing the right and left sections under the center section while adding more hair to the braid each time. Remember to keep the cells tight for a neat and defined braid.
- Continue braiding until you have incorporated your hair into the Dutch braid. Secure the end of the braid with a hair tie to keep it in place.
Finishing The Braid
- To add extra volume to your braid, gently pull on the sides to loosen it.
- If desired, you can pancake the braid by gently tugging on the edges to create a fuller and more textured look.
- To ensure your Dutch braid stays in place all day, use some hairspray or a lightweight styling product to hold everything in place.
And there you have it! You have successfully created a stunning Dutch braid. This hairstyle will turn heads whether you’re heading to a casual outing or a special event. Experiment with variations, such as side Dutch braids or double Dutch braids, to add versatility to your look. Now, go ahead and rock your stylish Dutch braid with confidence!
Tips And Tricks For Perfecting Your Dutch Braid
Learn how to perfect your Dutch braid with these helpful tips and tricks. Follow our step-by-step tutorial to achieve a beautiful and intricate Dutch braid hairstyle.
Sectioning The Hair Properly
Proper hair sectioning plays a crucial role when creating a perfect Dutch braid. To begin, make sure your hair is completely detangled and smooth. Start by creating a deep side or middle part, whichever you prefer. This will help in achieving a neat and symmetrical braid. Use a comb to create a clean parting line from the front of your head to the nape of your neck, dividing your hair into two sections.
Next, divide a small triangle-shaped section of hair from one side of the parting into three equal subsections. Weave the braid by crossing the right area under the center section, then cross the left area under the new center section. As you continue braiding, incorporate hair from both sides by picking up additional units before crossing under the center. Repeat this process until you reach the end of your hair, securing the braid with an elastic band.
You’ll ensure a more organized and structured Dutch braid by sectioning your hair properly.
Adding Extensions For Length And Volume
Adding extensions can be a game-changer if you have shorter or finer hair and want to achieve a fuller-looking Dutch braid. Hair extensions provide length and add volume to your braid, making it look more impressive.
To add extensions, select the right color and texture matching your natural hair. Clip-in extensions are the easiest to work with for this hairstyle. Begin by sectioning off the hair where you want to place the wings, ensuring it is aligned with your parting. Open the extension clip, position it close to the scalp, and then snap it shut. Repeat this process for multiple extensions, spacing them evenly throughout the braid.
You can transform your Dutch braid into a glamorous and voluminous hairstyle by strategically adding extensions.
Solving Common Dutch Braid Issues
The Dutch braid may seem simple, but sometimes, certain issues can arise during the braiding process. Here are some common problems and their solutions:
Issue 1: Slippery Hair
If your hair is silky or lacks grip, keeping the braid tight and secure can be challenging. To overcome this, apply some texturizing spray or dry shampoo to add texture and hold.
Issue 2: Uneven Sections
Uneven sections can make your braid look messy and less polished. To avoid this, use your fingers or a comb to divide the hair into clean and equal subsections before you start braiding. This will ensure a more symmetrical and uniform braid.
Issue 3: Loose Ends
If the ends of your Dutch braid unravel easily, you can secure them with small, clear hair elastics or bobby pins. Wrap the loose ends around your finger and tuck them under the braid, then connect them with an elastic or pin.
You can achieve a flawless and long-lasting braid by being aware of these common Dutch braid issues and employing the abovementioned solutions.

Frequently Asked Questions Of How To Make A Dutch Braid: A Step-By-Step Tutorial
How To Do Dutch Braids Step By Step?
To do Dutch braids step by step, start by crossing the right section under the center, then the left under the new center. Add more hair on the right and cross it under the center, then do the same on the left.
Continue alternating sides, adding more hair until all hair is incorporated, then braid to the ends.
How To Make Braids Step By Step?
To make a Dutch braid, follow these steps: 1. Cross right under the center, then left under the new center. 2. Add more hair to the right section and cross under the center. Repeat on the left. 3. Alternate crossing right and left under center, adding more hair each time.
4. Continue until all hair is incorporated and braid to the ends. For a visual guide, you can find tutorials on YouTube or wikiHow.
How To Do A Viking Dutch Braid?
To do a Viking Dutch braid, follow these steps: Cross the right strand under the center, then the left under the new center. Add more hair on the right, cross under the center, and repeat on the left side. Keep alternating crossing and adding coat until all hair is incorporated.
Braid to the ends.
How To Do A 3d Dutch Braid?
To create a 3D Dutch braid, cross the right strand under the center, then the left under the new center. Add more hair to the right section and cross it under the center, then repeat on the left.
Continue alternating and adding hair until all hair is incorporated, then braid to the ends.
Conclusion
To sum it up, learning to make a Dutch braid is not as complicated as it seems. You can easily achieve this trendy hairstyle with a step-by-step tutorial and some practice. Remember to cross the strands under the center, adding more hair.
The Dutch braid is versatile and can be styled in various ways. So, go ahead and experiment with different looks using this braiding technique. Mastering the Dutch braid will elevate your hairstyling skills.
DIY hair oils are some of the most important ingredients to have in your beauty arsenal. They add shine, manage frizzy hair, and help improve your hair health.